Discover how the Model Context Protocol (MCP) simplifies AI integrations. Learn why N×M integration problems become N+M solutions, and how to implement MCP in your AI applications.
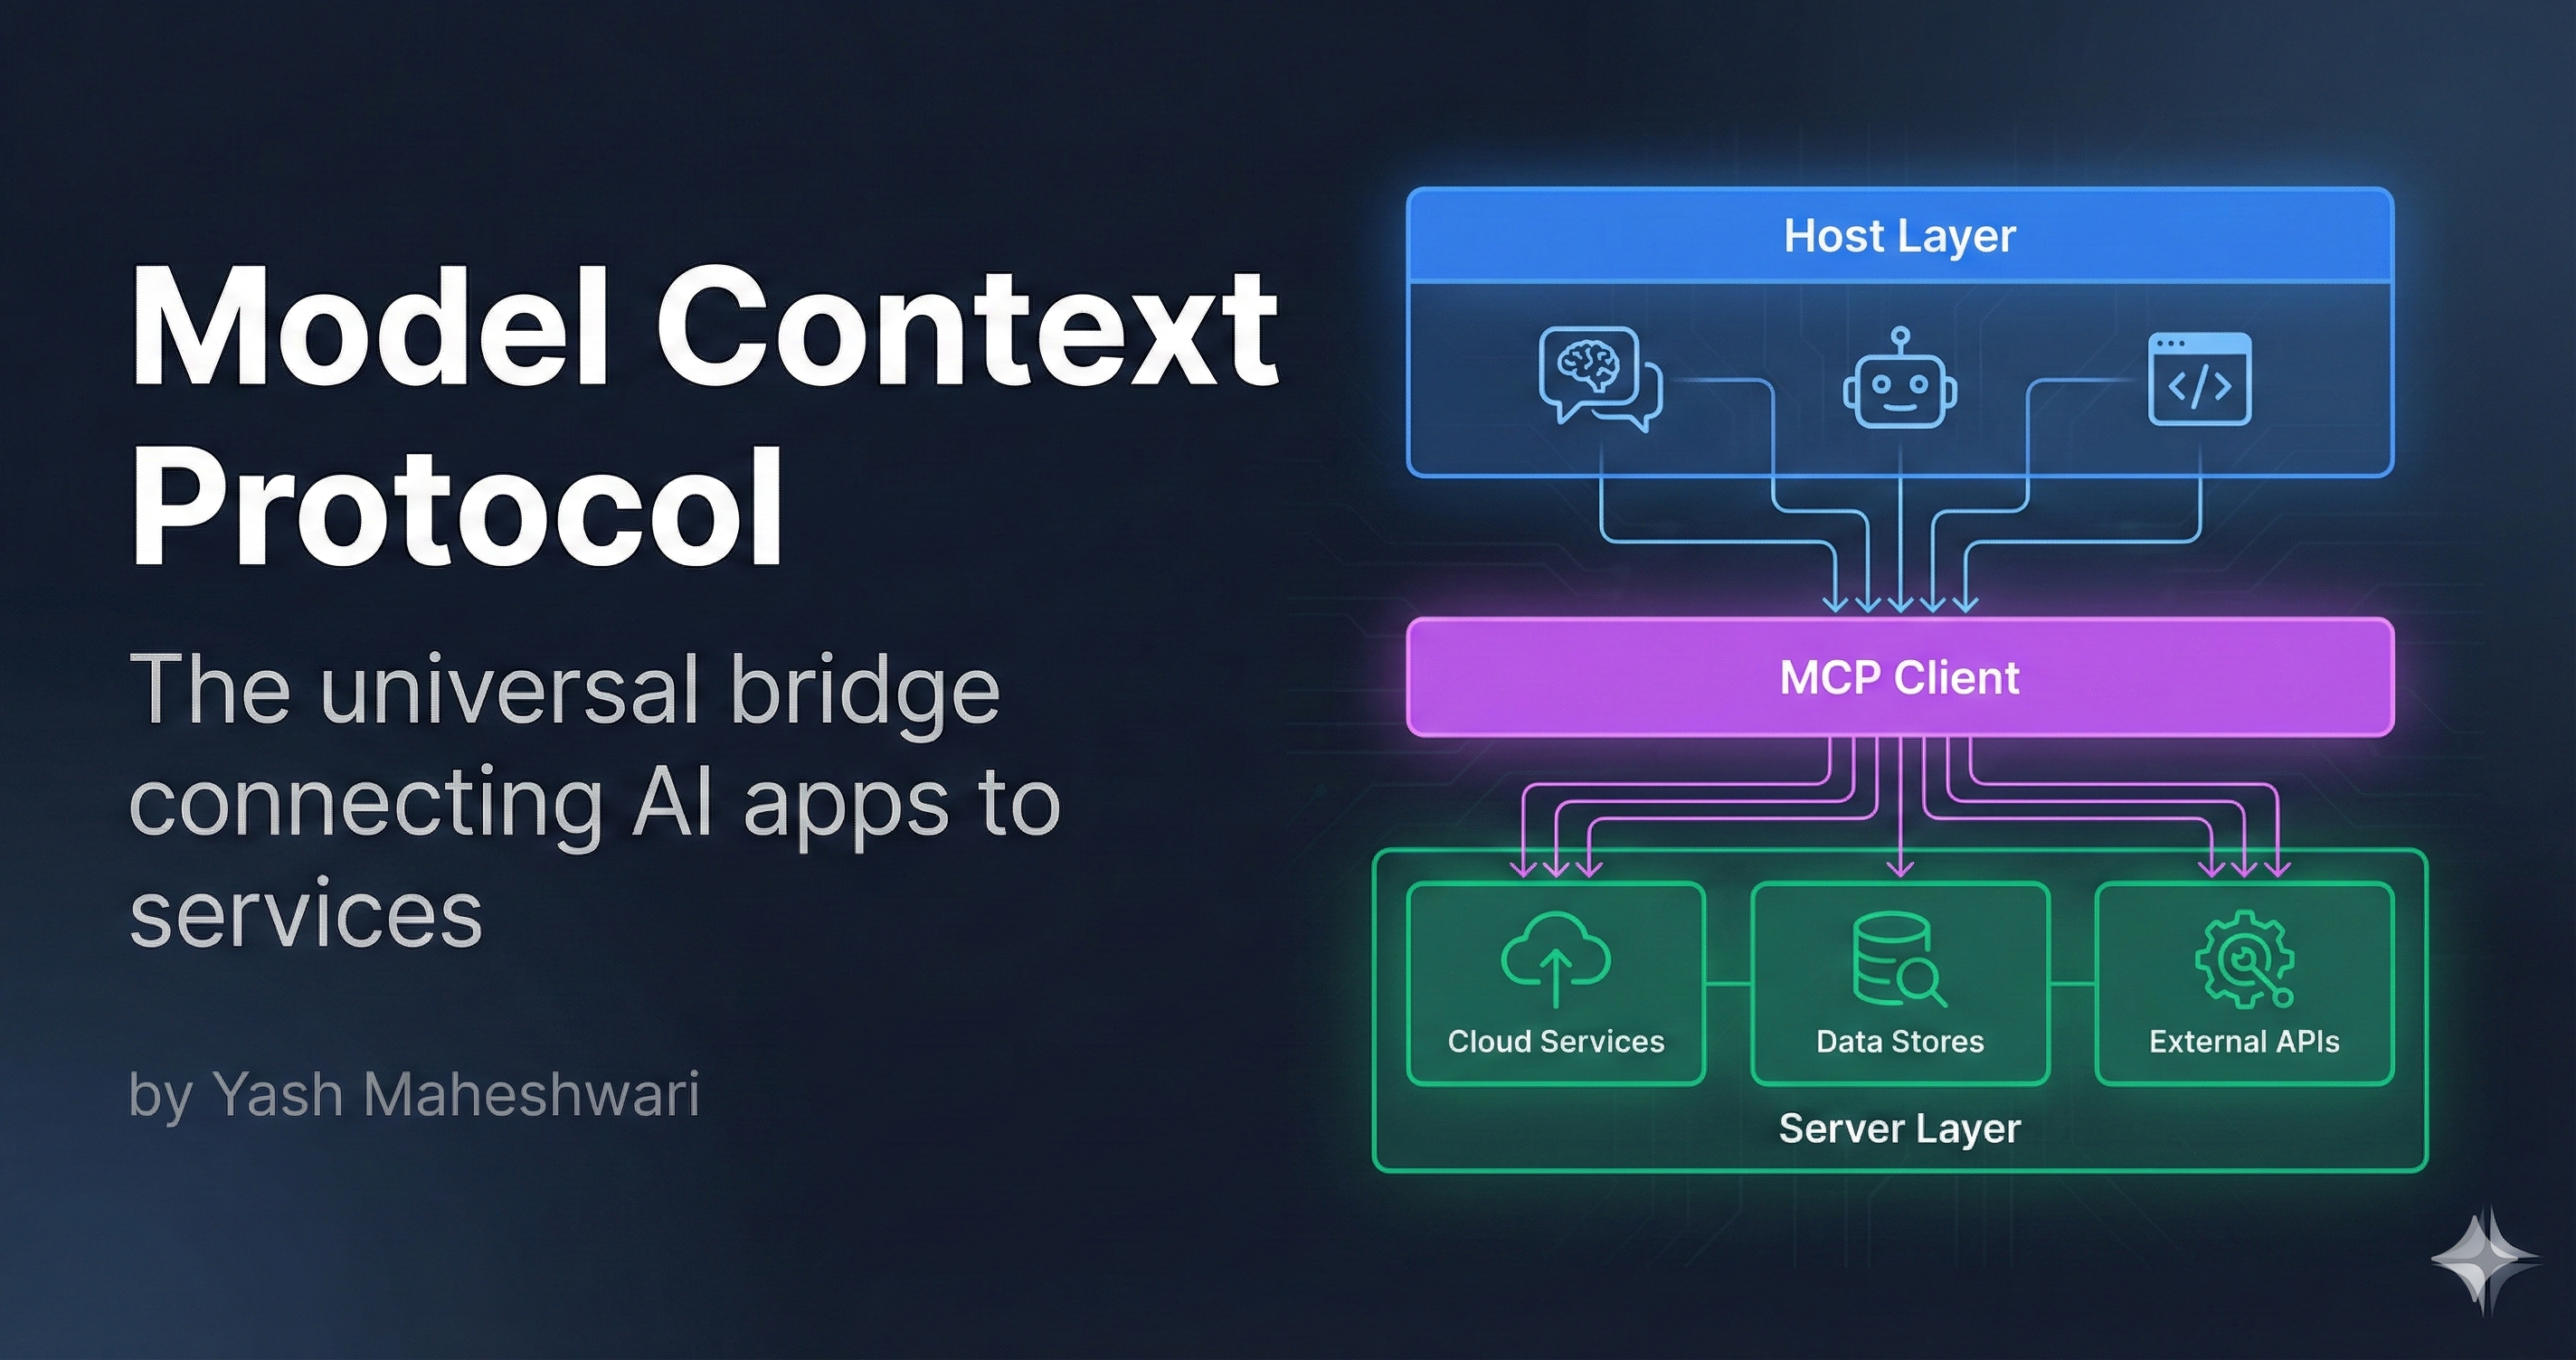
What is the Model Context Protocol?
Model Context Protocol (MCP) is a standardized framework that creates a universal bridge between AI applications (like Claude, ChatGPT) and external services or data sources (databases, APIs, file systems).
Think of it as the USB-C of AI integrations—one standardized connector instead of dozens of proprietary cables.
Layer"] B1S1["GitHub"] B1S2["Drive"] B1S3["Database"] B1S4["Slack"] B1 -->|"Standard"| MCP B2 -->|"Standard"| MCP B3 -->|"Standard"| MCP MCP -->|"Standard"| B1S1 MCP -->|"Standard"| B1S2 MCP -->|"Standard"| B1S3 MCP -->|"Standard"| B1S4 style B1 fill:#50c878,stroke:#fff,stroke-width:2px,color:#fff style B2 fill:#50c878,stroke:#fff,stroke-width:2px,color:#fff style B3 fill:#50c878,stroke:#fff,stroke-width:2px,color:#fff style MCP fill:#00d9ff,stroke:#fff,stroke-width:3px,color:#000 style B1S1 fill:#4a90e2,stroke:#fff,stroke-width:2px,color:#fff style B1S2 fill:#4a90e2,stroke:#fff,stroke-width:2px,color:#fff style B1S3 fill:#4a90e2,stroke:#fff,stroke-width:2px,color:#fff style B1S4 fill:#4a90e2,stroke:#fff,stroke-width:2px,color:#fff end
The N×M Integration Problem
Before MCP, integrating multiple AI applications with multiple services meant building N × M custom bridges:
- 3 AI apps × 4 services = 12 custom integrations
- Each integration had different auth, error handling, retry logic
- Maintenance nightmare as services update APIs
- Security vulnerabilities multiply with each bridge
With MCP: Each AI app connects once to MCP. Each service implements MCP once. 3 + 4 = 7 total integrations instead of 12.
Architecture: Three Layers of MCP
MCP operates on a simple three-layer model:
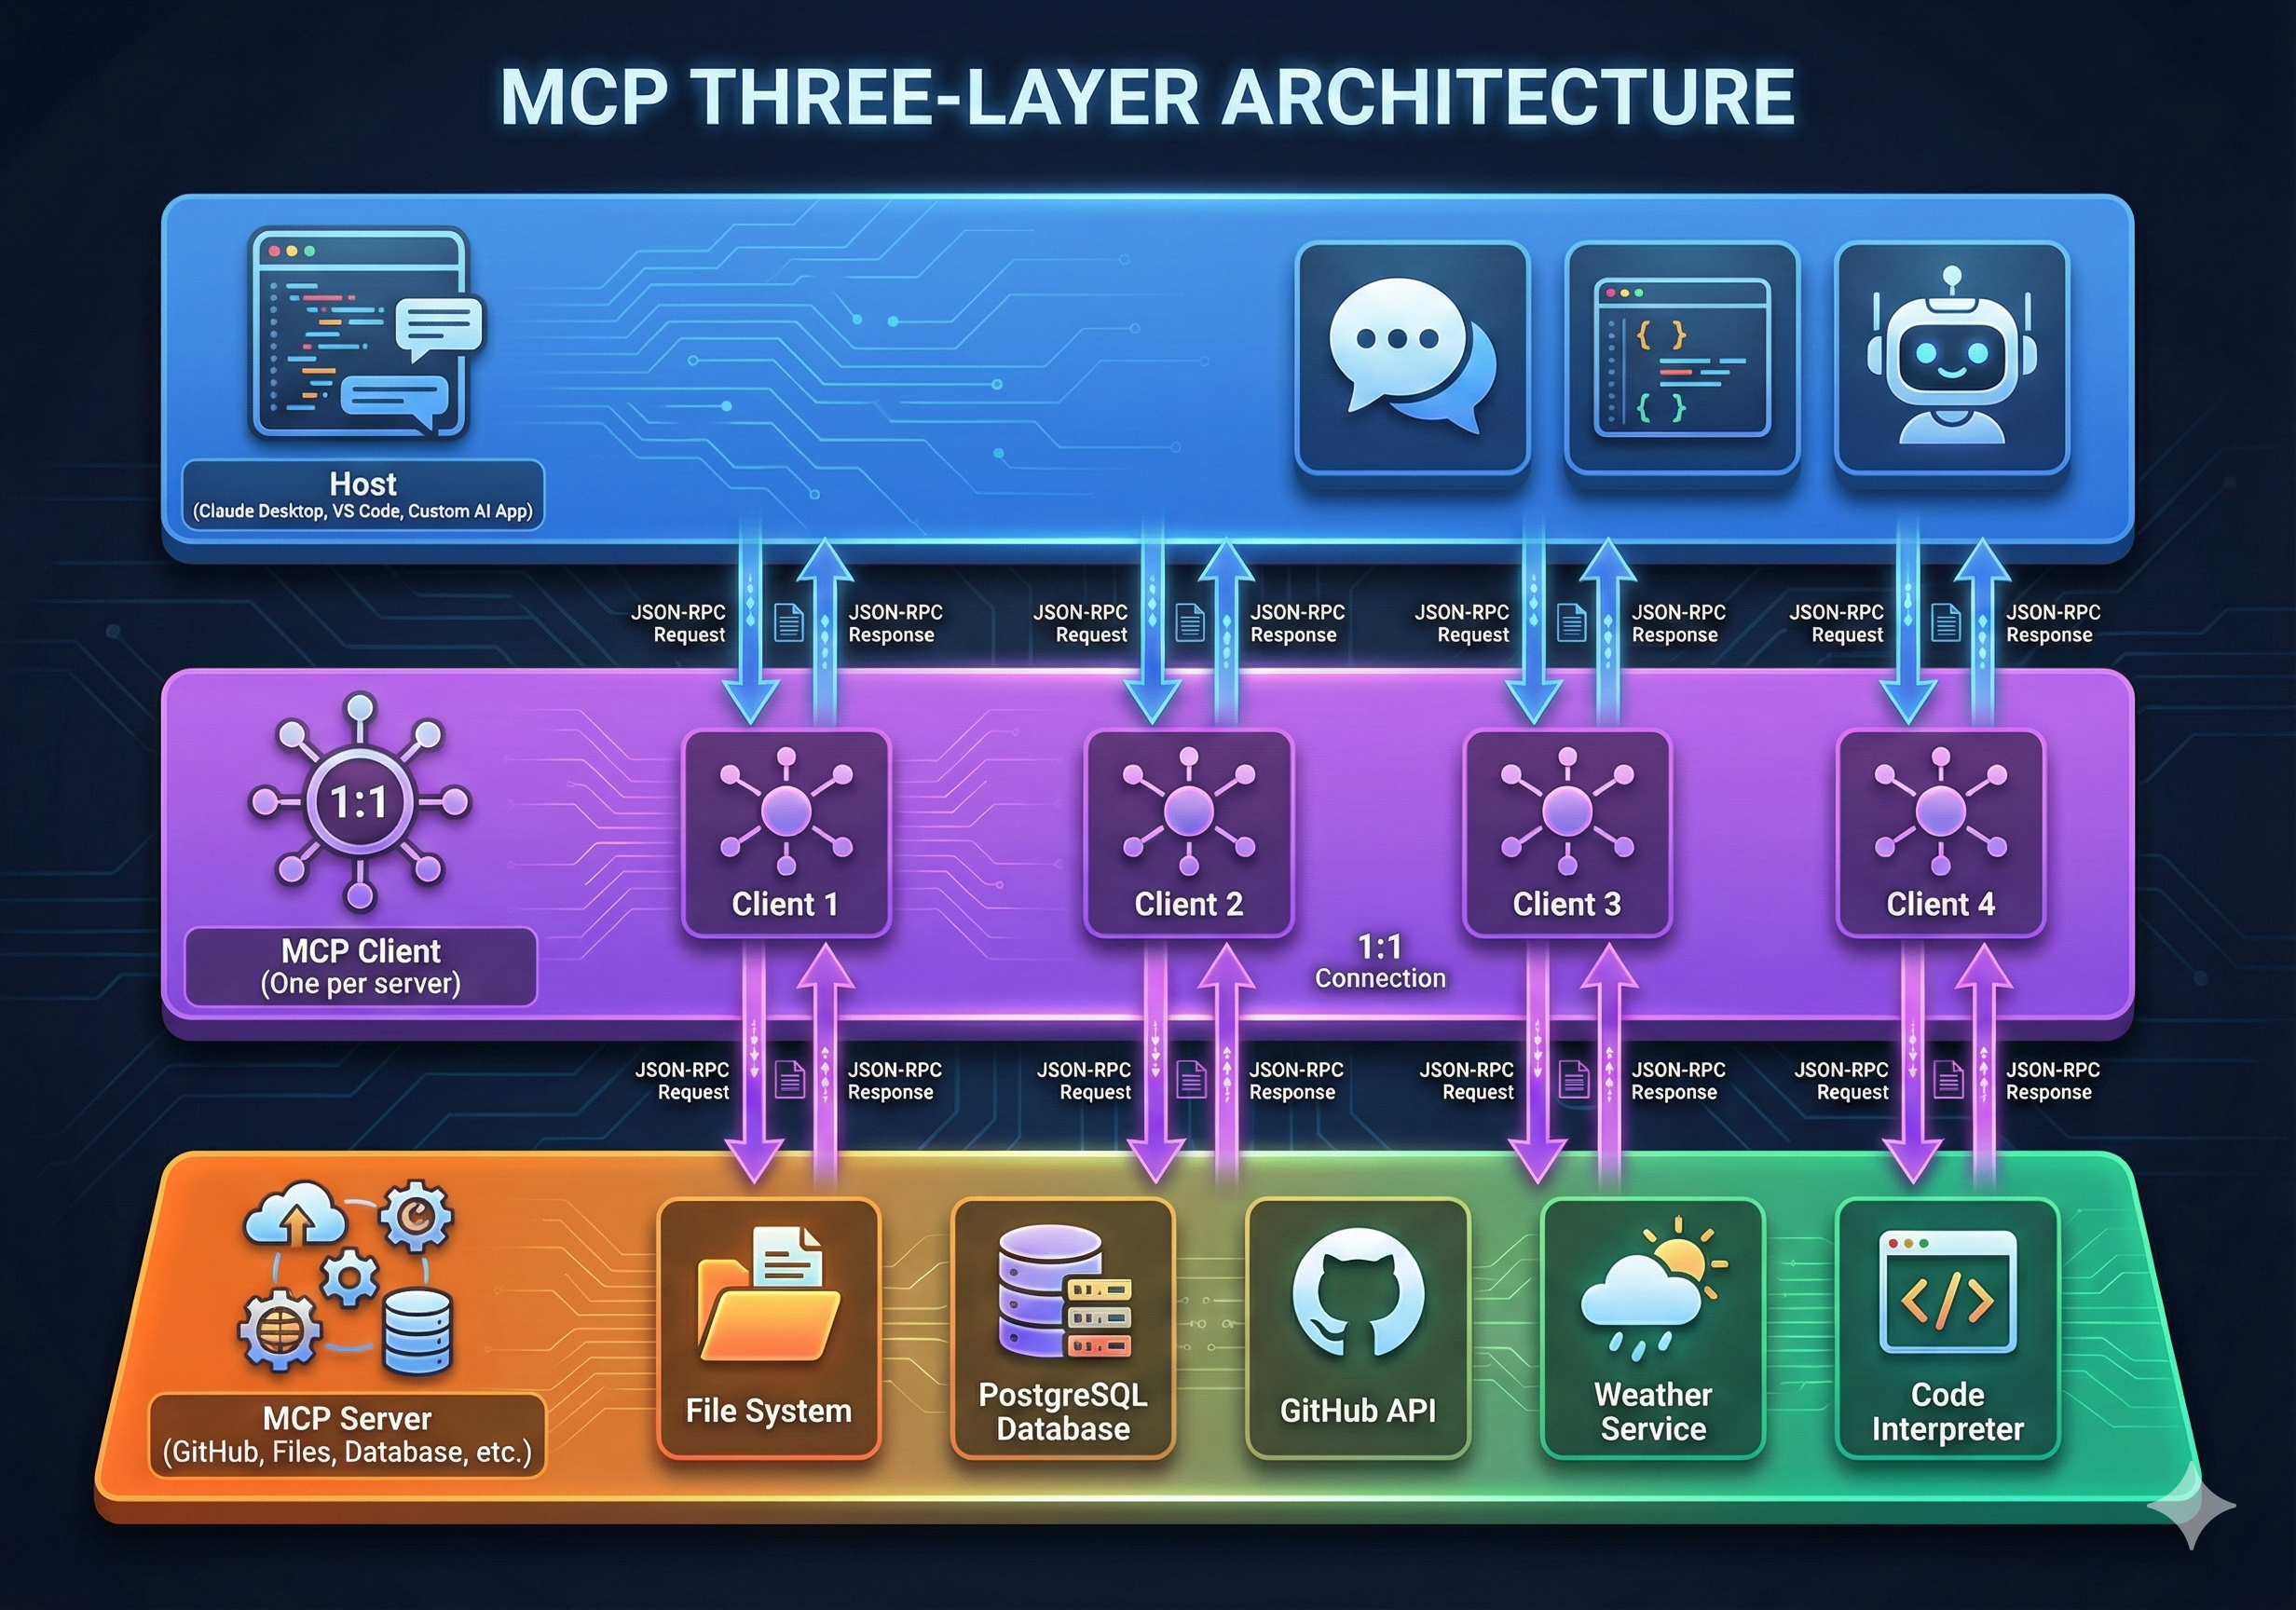
Layer 1: Host (Applications)
The Host layer includes all user-facing AI applications:
- Claude / ChatGPT (for conversational AI)
- IDEs (VS Code with AI assistants)
- Custom AI applications (built with LangChain, LlamaIndex)
Hosts don't care about backend details. They just need to call tools and get results.
Layer 2: Client (MCP Client)
The MCP Client sits between the Host and Servers, managing:
- Connection initialization and capability negotiation
- Tool discovery ("What can I call?")
- Tool execution ("Call this tool with these parameters")
- Error handling and retries
- Security and authentication
Layer 3: Server (External Services)
Servers are the actual integrations—GitHub API, database connections, file systems, etc.
Each server implements the MCP Server interface:
{
  "server": {
    "name": "github-server",
    "version": "1.0.0",
    "tools": [
      {
        "name": "list_repositories",
        "description": "List all repositories for a user",
        "inputSchema": {
          "type": "object",
          "properties": {
            "username": { "type": "string" }
          }
        }
      },
      {
        "name": "create_issue",
        "description": "Create a new GitHub issue",
        "inputSchema": { ... }
      }
    ]
  }
}
Protocol Lifecycle: Init → Operate → Shutdown
MCP follows a well-defined three-phase lifecycle:
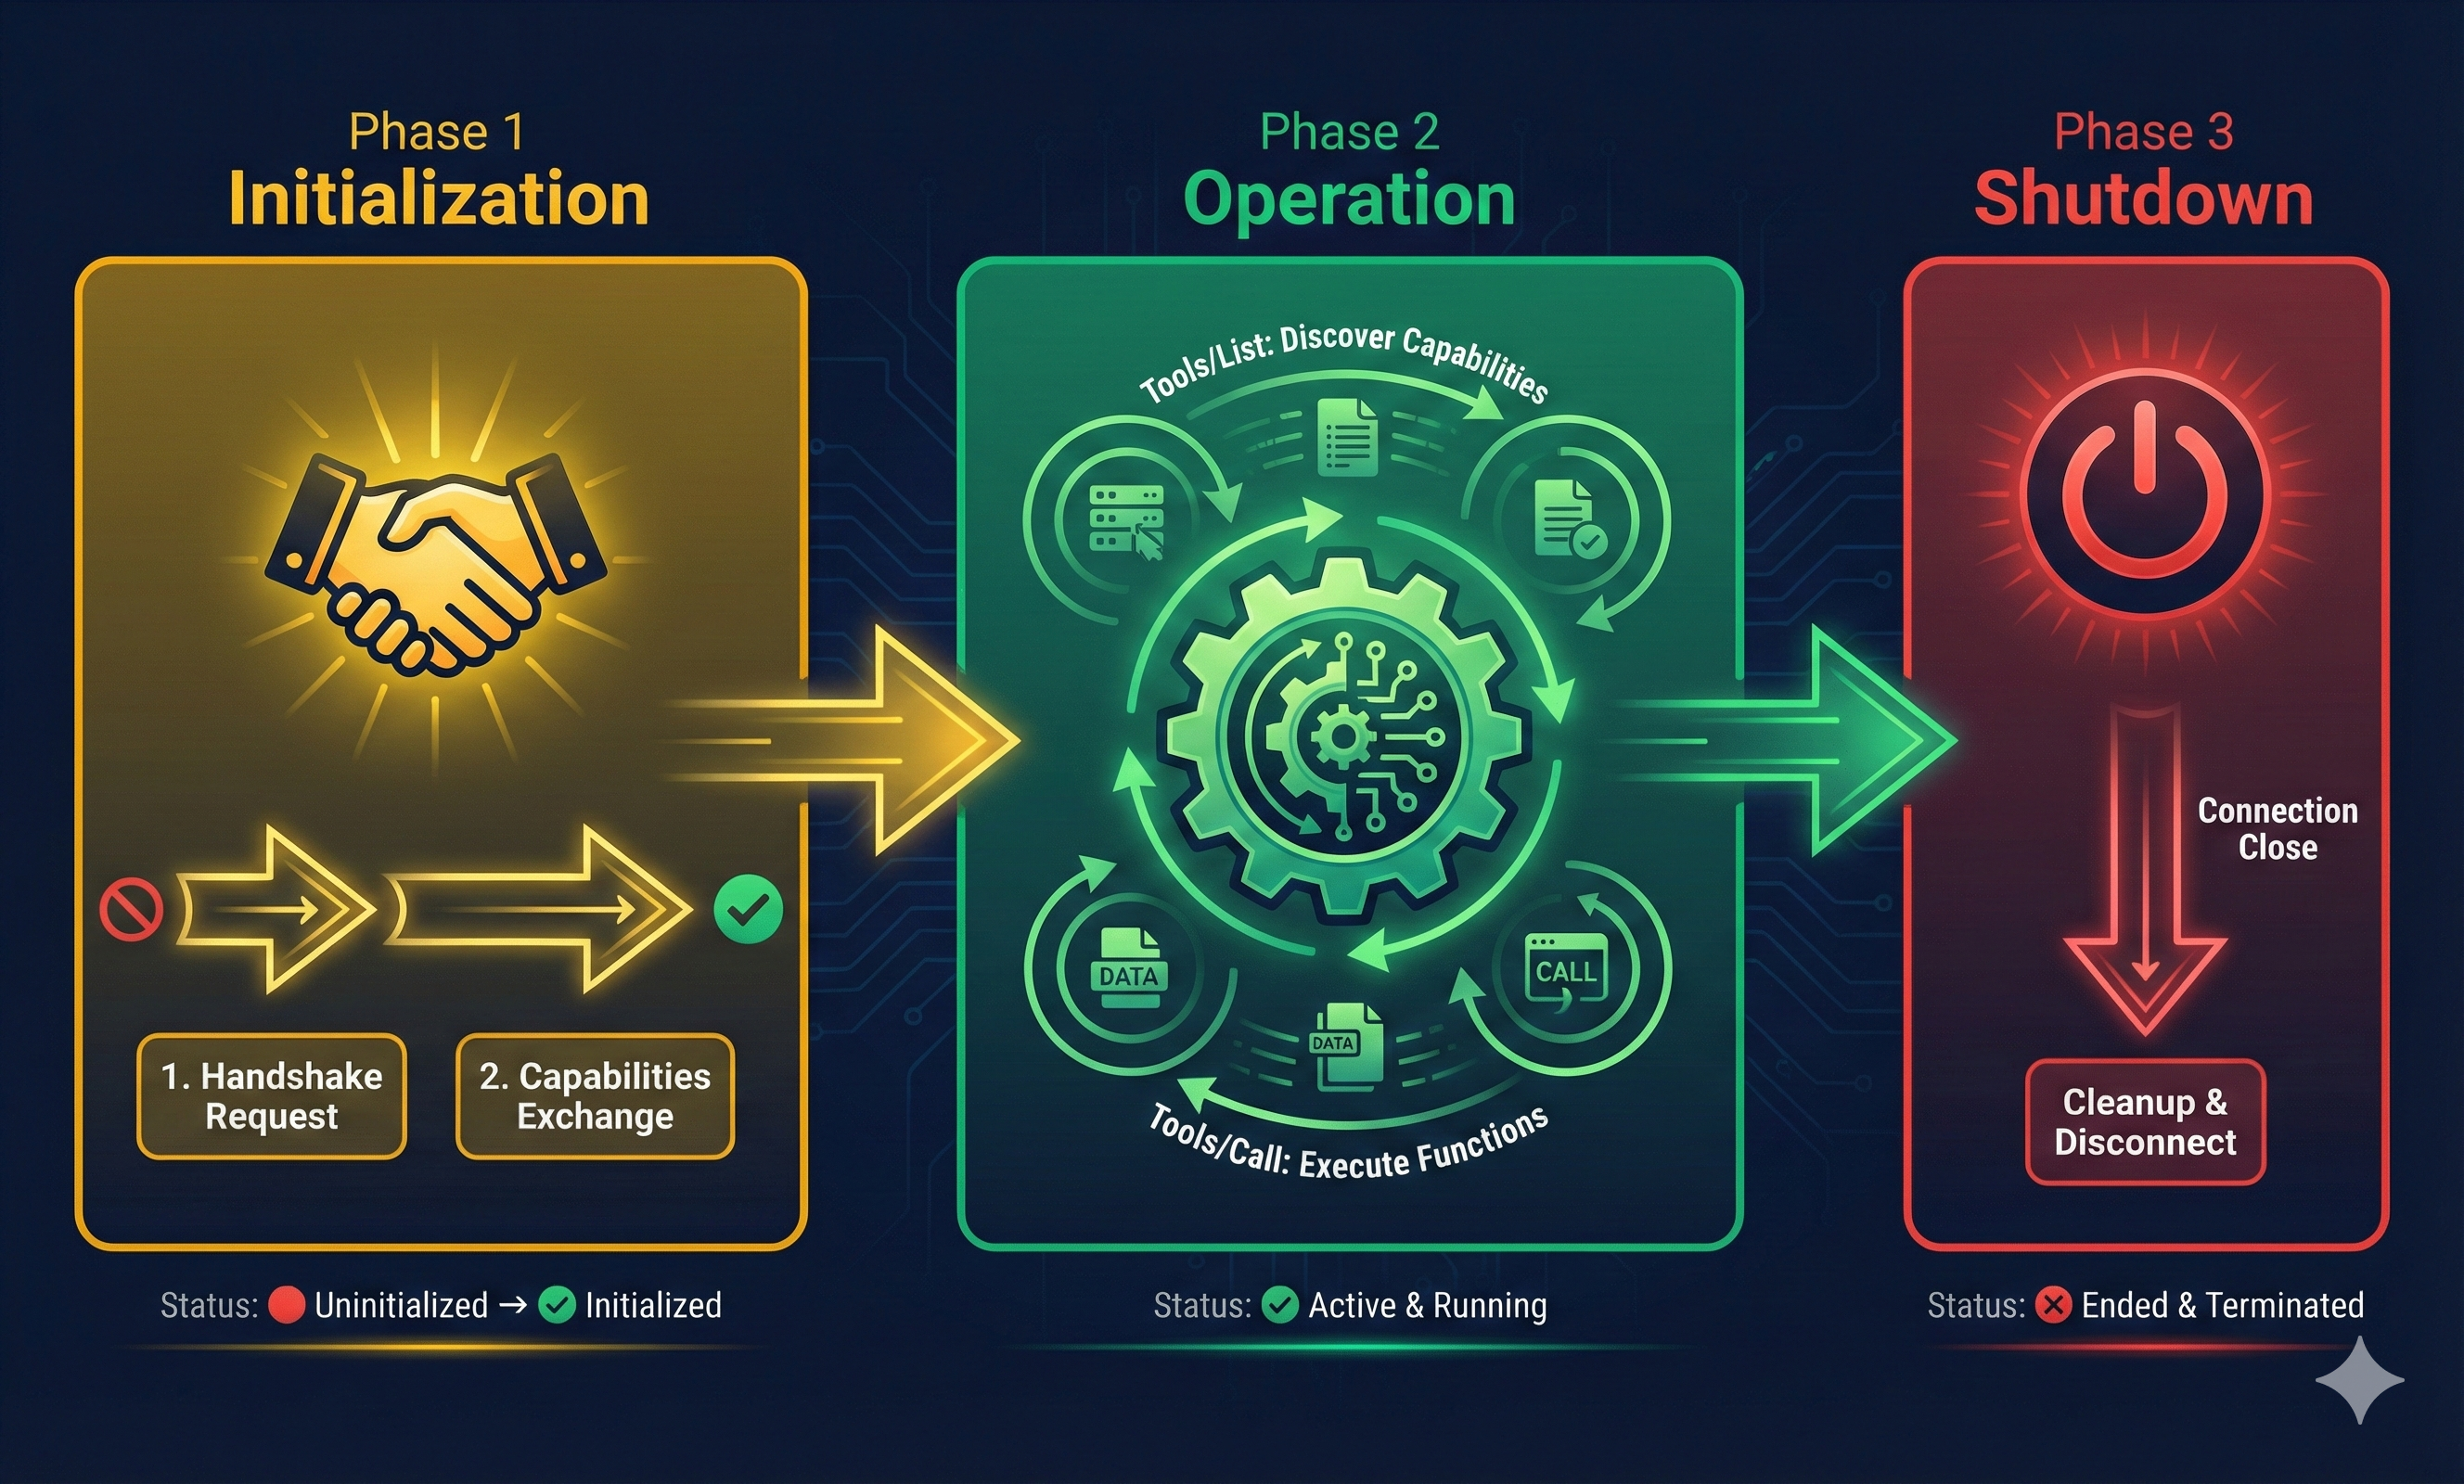
Phase 1: Initialization
Client → Server: {
  "jsonrpc": "2.0",
  "id": 1,
  "method": "initialize",
  "params": {
    "protocolVersion": "2024-11-05",
    "capabilities": {...},
    "clientInfo": {
      "name": "my-app",
      "version": "1.0"
    }
  }
}

Server → Client: {
  "jsonrpc": "2.0",
  "id": 1,
  "result": {
    "protocolVersion": "2024-11-05",
    "capabilities": {...},
    "serverInfo": {
      "name": "github-server",
      "version": "1.0"
    }
  }
}
Phase 2: Operation
Once initialized, the client can call tools repeatedly:
Client → Server: {
  "jsonrpc": "2.0",
  "id": 2,
  "method": "tools/call",
  "params": {
    "name": "list_repositories",
    "arguments": { "username": "torvalds" }
  }
}

Server → Client: {
  "jsonrpc": "2.0",
  "id": 2,
  "result": {
    "content": [
      {
        "type": "text",
        "text": "[List of repositories...]"
      }
    ]
  }
}
Phase 3: Shutdown
Client → Server: {
  "jsonrpc": "2.0",
  "id": 3,
  "method": "close"
}
Error Handling & Recovery
In production, things fail. MCP uses JSON-RPC error responses to communicate failures clearly.
Standard Error Response Format
Server → Client: {
  "jsonrpc": "2.0",
  "id": 2,
  "error": {
    "code": -32000,
    "message": "Server error",
    "data": {
      "detail": "Database connection failed",
      "retryable": true,
      "retry_after_ms": 5000
    }
  }
}
Common Error Scenarios
1. Invalid Arguments
Client → Server: {
  "jsonrpc": "2.0",
  "id": 2,
  "method": "tools/call",
  "params": {
    "name": "add_expense",
    "arguments": { "amount": "not-a-number", "category": "food" }
  }
}

Server → Client: {
  "jsonrpc": "2.0",
  "id": 2,
  "error": {
    "code": -32602,
    "message": "Invalid params",
    "data": { "field": "amount", "reason": "Expected number, got string" }
  }
}
2. Timeout/Server Unavailable
Server → Client: {
  "jsonrpc": "2.0",
  "id": 2,
  "error": {
    "code": -32000,
    "message": "Server error",
    "data": {
      "detail": "Database query timed out after 30s",
      "retryable": true,
      "retry_after_ms": 10000
    }
  }
}
3. Authorization Failure
Server → Client: {
  "jsonrpc": "2.0",
  "id": 2,
  "error": {
    "code": -32001,
    "message": "Forbidden",
    "data": {
      "detail": "User lacks 'expense:write' permission",
      "retryable": false,
      "required_scope": "expense:write"
    }
  }
}
How Clients Should Handle Errors
- Retryable errors (timeout, server error): Implement exponential backoff. Wait before retrying.
- Non-retryable errors (invalid args, auth failure): Log and surface to user. Don't retry.
- Use `retry_after_ms` hint: Servers specify how long to wait—respect it.
- Circuit breaker pattern: If a server fails repeatedly, stop trying temporarily.
Wait: 2^n + jitter"] E --> F["Retry Call"] F --> G{"Success?"} G -->|"Yes"| H["Return Result"] G -->|"No"| I{"Max Retries?"} I -->|"No"| E I -->|"Yes"| J["Give Up
Log Error"] D --> K["Log Error
Surface to User"] H --> L["Success"] J --> L K --> L style A fill:#ff9500,stroke:#fff,stroke-width:2px,color:#fff style C fill:#666,stroke:#fff,stroke-width:2px,color:#fff style D fill:#ff6b6b,stroke:#fff,stroke-width:2px,color:#fff style E fill:#4a90e2,stroke:#fff,stroke-width:2px,color:#fff style H fill:#50c878,stroke:#fff,stroke-width:2px,color:#fff style J fill:#ff6b6b,stroke:#fff,stroke-width:2px,color:#fff style K fill:#ff6b6b,stroke:#fff,stroke-width:2px,color:#fff style L fill:#50c878,stroke:#fff,stroke-width:3px,color:#fff
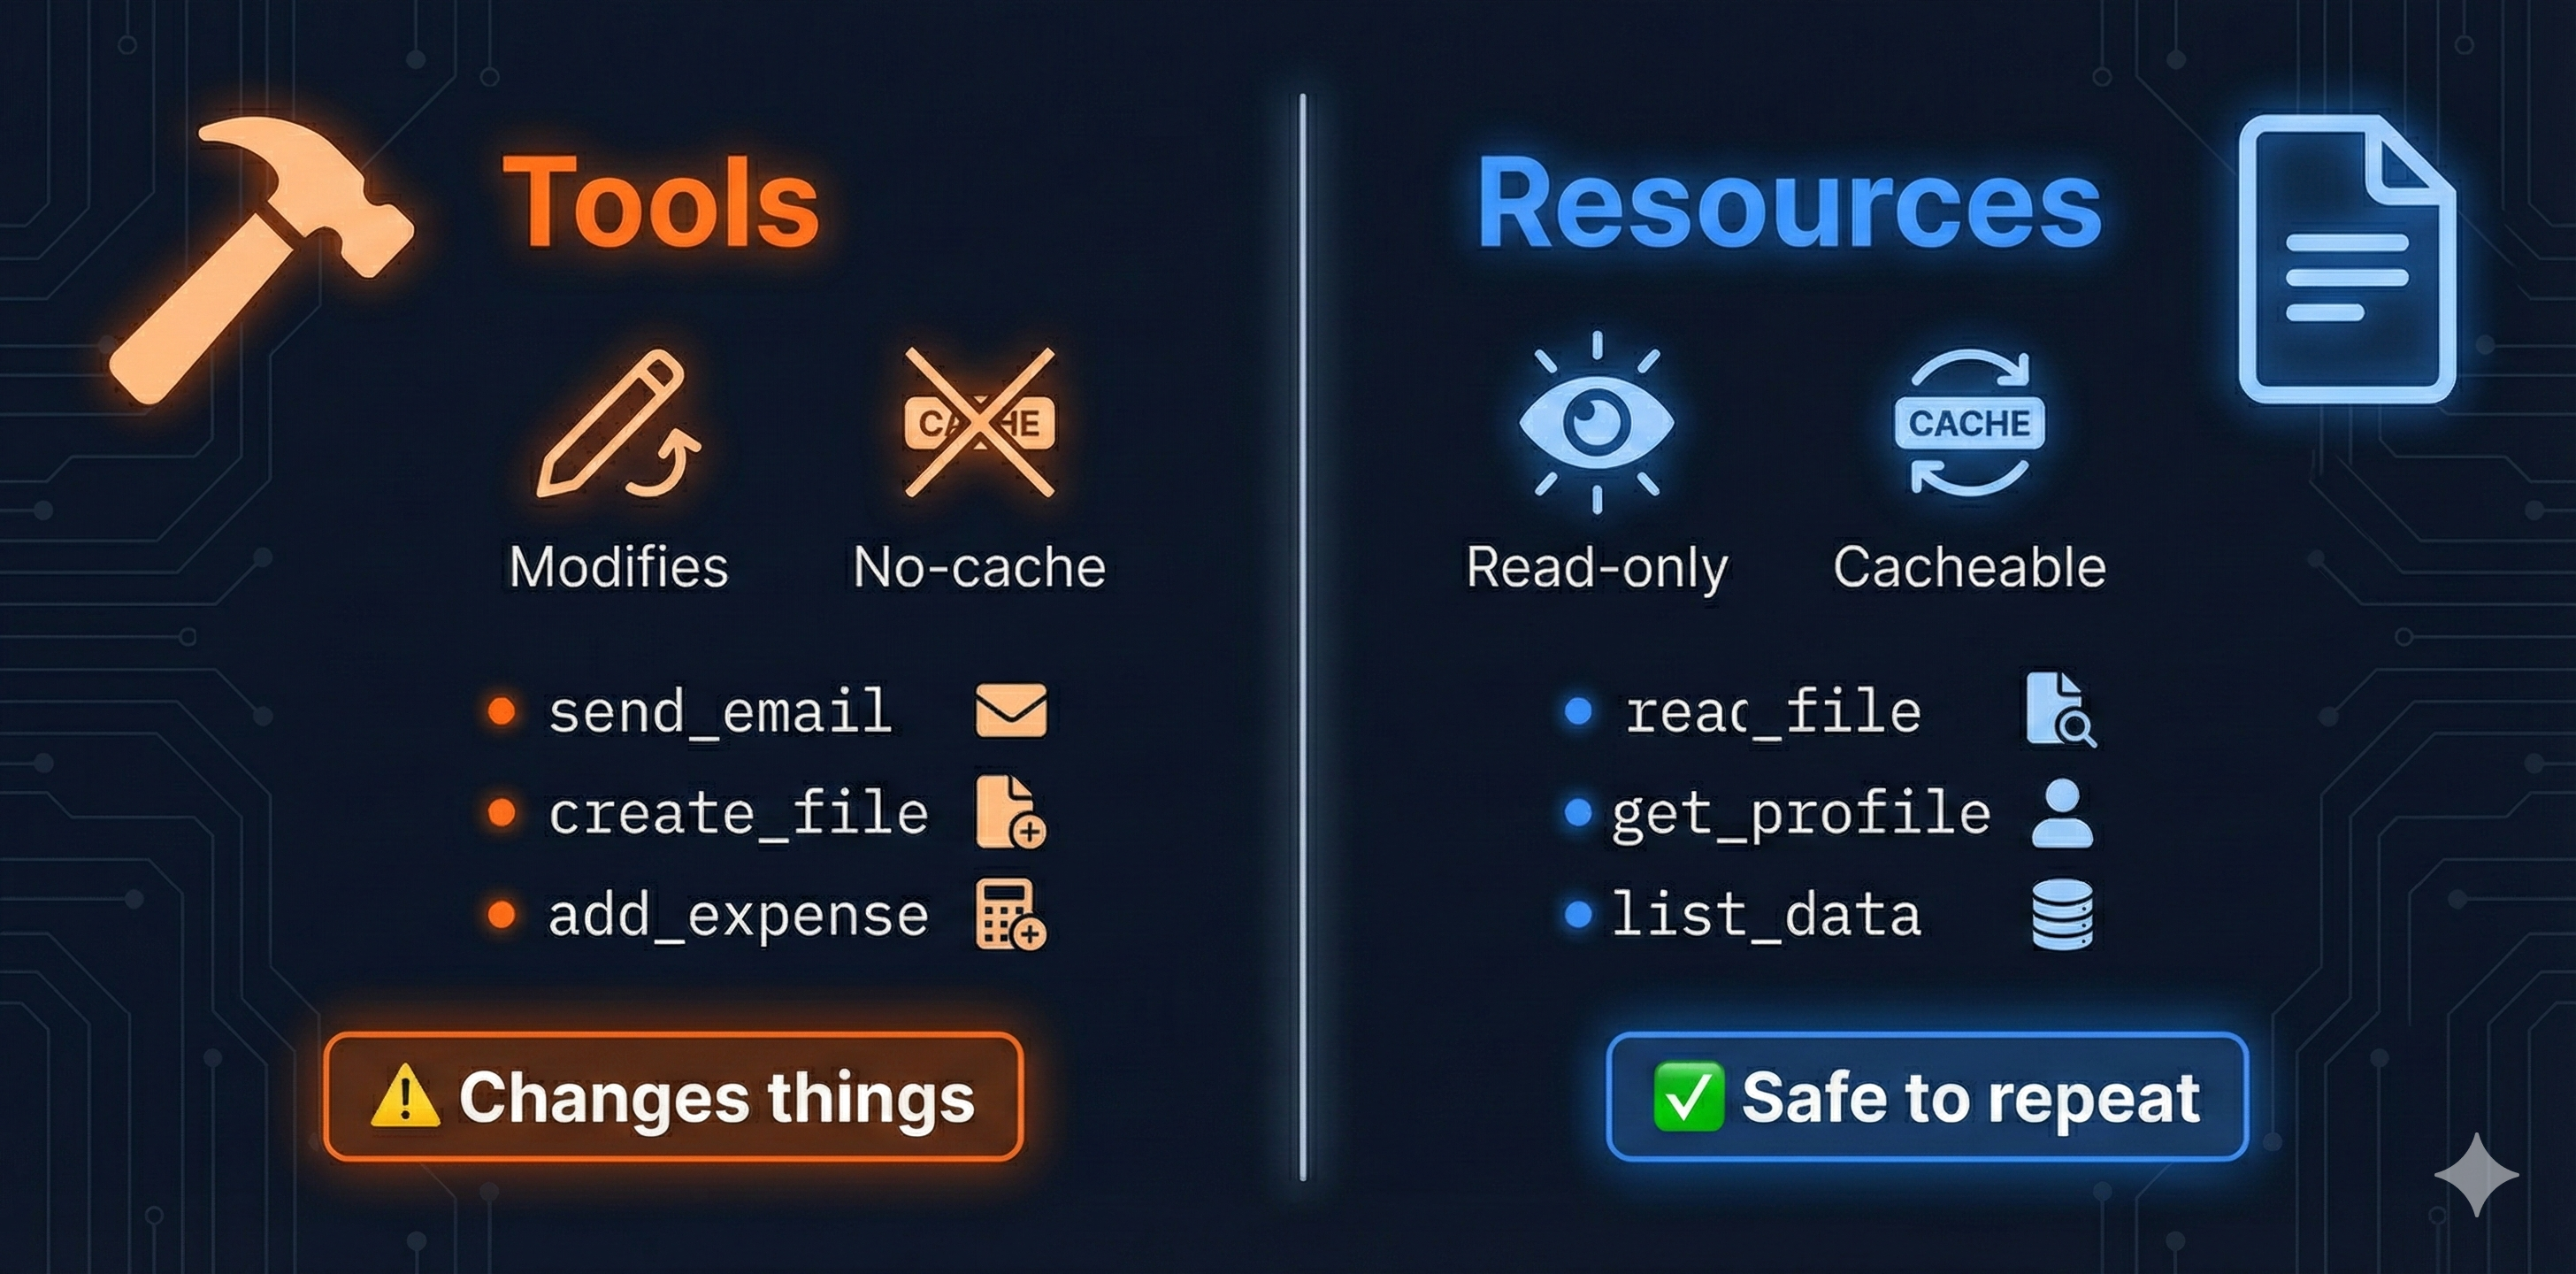
Tools vs Resources: The Two Pillars
MCP distinguishes between two types of capabilities:

Tools: Modifications & Actions
Tools are callable functions that modify state or perform actions:
- Writing files - `create_file`, `update_file`
- Sending messages - `send_email`, `post_slack`
- Database updates - `add_expense`, `update_record`
- External actions - `create_issue`, `deploy_app`
Key property: Tools change state. Calling them multiple times produces different results (unless you're resetting state).
Resources: Data & Information
Resources are read-only data sources:
- File contents - `read_file`, `list_files`
- User profiles - `get_profile`, `list_users`
- Metrics & logs - `query_database`, `get_analytics`
- Documentation - `search_docs`, `get_schema`
Key property: Resources are safe to call repeatedly. The AI can fetch the same data multiple times without side effects.
Resilience Patterns: Retries, Timeouts & Rate Limiting
Production systems fail. MCP clients need robust retry strategies.
Exponential Backoff with Jitter
import time
import random

def call_with_retries(client, tool_name, args, max_retries=5):
    """Call a tool with exponential backoff"""

    for attempt in range(max_retries):
        try:
            result = client.call_tool(tool_name, args)
            return result
        except TimeoutError as e:
            if attempt == max_retries - 1:
                raise  # Give up after max retries

            # Exponential backoff: 2^attempt seconds + random jitter
            wait_time = (2 ** attempt) + random.uniform(0, 1)
            print(f"Attempt {attempt + 1} failed. Waiting {wait_time:.1f}s...")
            time.sleep(wait_time)

        except (ValueError, PermissionError) as e:
            # Non-retryable errors—fail immediately
            raise

# Usage
result = call_with_retries(client, "add_expense", {"amount": 50, "category": "food"})
Timeout Policies
- Connection timeout: 5-10 seconds (time to establish connection)
- Read timeout: 30-60 seconds (time to receive response)
- Request timeout: 60-120 seconds (total time for entire operation)
Implementation tip: Set timeouts per-tool. Some operations are naturally slower (database queries vs API calls).
Rate Limiting & Backpressure
import asyncio
from time import time

class RateLimiter:
    """Async token bucket rate limiter"""

    def __init__(self, tokens_per_second: int = 10, max_burst: int = 20):
        self.rate = tokens_per_second
        self.capacity = max_burst
        self.tokens = max_burst
        self.last_update = time()

    async def acquire(self) -> None:
        """Wait if necessary until we have a token"""
        now = time()
        elapsed = now - self.last_update
        self.tokens = min(self.capacity, self.tokens + elapsed * self.rate)
        self.last_update = now

        if self.tokens >= 1:
            self.tokens -= 1
            return  # Token acquired, proceed

        # No tokens—wait asynchronously
        wait_time = (1 - self.tokens) / self.rate
        await asyncio.sleep(wait_time)
        self.tokens = 0

# Usage (async context)
limiter = RateLimiter(tokens_per_second=5)  # Max 5 calls/second

for i in range(20):
    await limiter.acquire()
    result = await client.call_tool("get_user", {"id": i})
When to rate limit: When server returns HTTP 429 (Too Many Requests), back off. Respect `retry_after_ms` hints in error responses.
Exponential Backoff Curve
Here's what exponential backoff looks like in practice:
Fail
Wait 1s"] --> B["Attempt 2
Fail
Wait 2s"] B --> C["Attempt 3
Fail
Wait 4s"] C --> D["Attempt 4
Fail
Wait 8s"] D --> E["Attempt 5
Fail
Wait 16s"] E --> F["Attempt 6
Success
Total: 31s"]
Key insight: Each retry doubles the wait time. By attempt 5, you've waited ~31 seconds total. Most services recover by then.
These resilience patterns—retries, timeouts, rate limiting—are essential building blocks. But they only matter if you're building something worth protecting. Let's step back and understand why MCP is transforming AI application development.
Why MCP Matters (Now More Than Ever)

As AI applications become more sophisticated, integration complexity explodes. MCP solves this fundamental problem:
- Plug-and-play integrations - Add any MCP server to any MCP client instantly
- Security by design - Explicit tool definitions, rate limiting, audit logs
- Easier maintenance - Update one server spec instead of patching all clients
- Scalability - From hobby projects to enterprise deployments
- Community ecosystem - Share servers across teams and organizations
- Natural language interfaces - Users interact via conversational AI, not forms
- Future-proof - Protocol standardization means your tools work with future LLMs
MCP is infrastructure, not magic. It doesn't make your AI smarter—it makes your AI more capable by providing standardized access to tools and data.
Real-World Use Cases
MCP is being used in production across various domains:
- Development Tools: VS Code extensions, Claude Desktop integrations, custom IDE assistants
- Data Analysis: AI agents querying databases, generating reports, analyzing metrics in real-time
- DevOps Automation: Infrastructure provisioning, deployment pipelines, log analysis and alerting
- Customer Support: AI assistants with access to CRM, ticketing systems, knowledge bases
- Content Management: Automated publishing, multi-platform syndication, SEO optimization
Now let's explore how to secure these integrations properly.
Security Model: Authorization, Scopes & Audit Logging
When MCP connects external services to AI applications, security becomes critical. MCP provides a complete security model—not just TLS.
Scope-Based Authorization
MCP servers define scopes—permissions that control what clients can do:
Server Configuration: {
  "tools": [
    {
      "name": "add_expense",
      "required_scope": "expense:write",
      "description": "Record a new expense"
    },
    {
      "name": "list_expenses",
      "required_scope": "expense:read",
      "description": "List expenses"
    },
    {
      "name": "delete_expense",
      "required_scope": "expense:admin",
      "description": "Delete an expense"
    }
  ]
}

Client Authorization Header: {
  "Authorization": "Bearer token-with-expense:read,expense:write"
}

Result: Client can call add_expense and list_expenses, but not delete_expense
Principle of Least Privilege
- Read-only scopes: For AI applications that only need to fetch data, grant `resource:read` only.
- Write-restricted scopes: For AI that can modify data, grant specific write scopes (e.g., `expense:write` but NOT `user:write`).
- Admin scopes: Reserve for operators only. Never grant to AI applications.
Audit Logging & Compliance
Every tool call should be logged:
Audit Log Entry: {
  "timestamp": "2026-01-26T14:23:15Z",
  "client_id": "claude-ai-prod",
  "tool_name": "add_expense",
  "arguments": {
    "amount": 50,
    "category": "food",
    "description": "coffee"
  },
  "result": "success",
  "scopes_used": ["expense:write"],
  "user_id": "alice@company.com",
  "ip_address": "192.168.1.100"
}
Why this matters: If an AI application goes rogue (or is compromised), audit logs show exactly what it did, when, and who authorized it. Non-negotiable for regulated industries (finance, healthcare, legal).
Scope Authorization Matrix
resource:read
expense:read"] W["Write Scopes
resource:write
expense:write"] A["Admin Scopes
user:admin
config:admin"] end subgraph Apps ["AI Applications"] AI1["Claude"] AI2["GPT"] AI3["Custom App"] end subgraph Permissions ["Granted Permissions"] P1["Claude: read+write"] P2["GPT: read-only"] P3["Custom: read+write+admin"] end R -.-> P1 W -.-> P1 A -.-> P3 AI1 --> P1 AI2 --> P2 AI3 --> P3
Rate Limiting as Security
Rate limiting isn't just performance—it's security:
- Prevent abuse: A compromised AI app can't hammer your database with infinite requests
- Protect resources: Expensive operations (large file transfers, complex queries) are naturally throttled
- Cost control: Prevents runaway bills from API calls
Configuration example: "Claude AI can make 100 read calls/minute and 10 write calls/minute"
With security and authorization handled, the next question is: how does data actually flow between clients and servers? MCP supports multiple transport mechanisms, each optimized for different deployment scenarios.
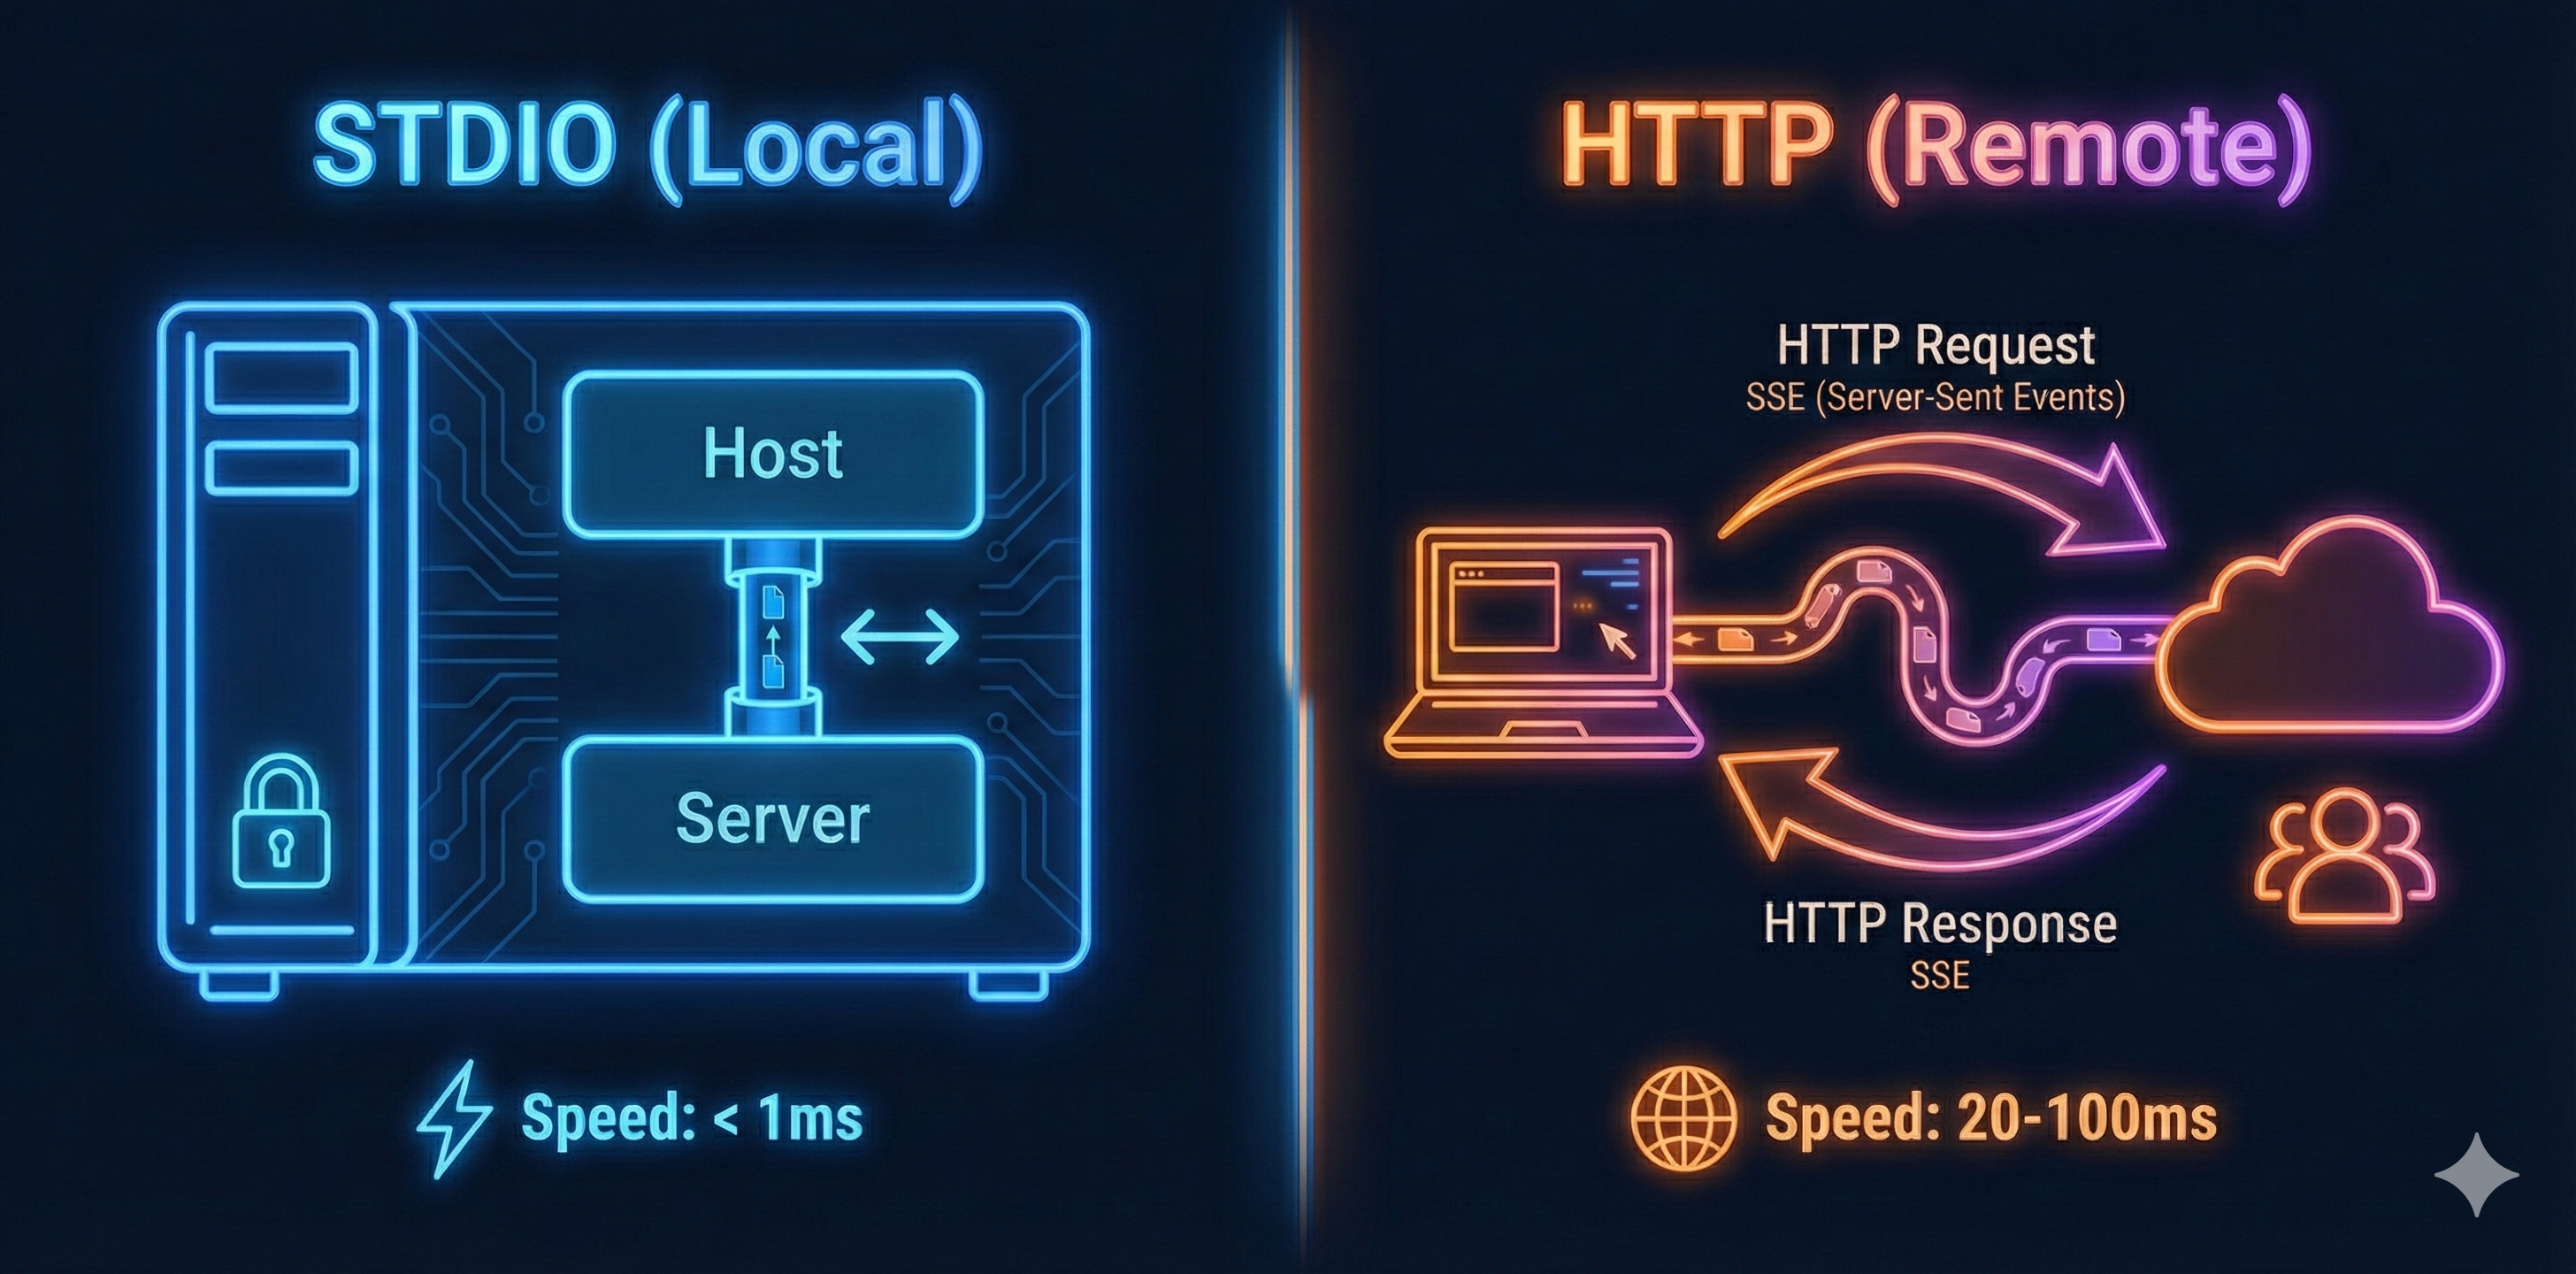
Transport Mechanisms: STDIO vs HTTP
MCP supports multiple transport mechanisms. The protocol stays the same—only the delivery method changes.
STDIO: Ultra-Fast Local Communication
For local integrations (Host and Server on same machine), STDIO provides sub-millisecond latency:
- Communication: Standard input/output pipes
- Latency: <1ms (process-to-process)
- Use case: Development, single-machine deployments, Claude Desktop
- Security: Limited to same machine (perfect for local privacy)
HTTP + SSE: Distributed Remote Access
For remote integrations (Host and Server on different machines), HTTP provides network-based communication:
- Communication: HTTP requests + Server-Sent Events (SSE)
- Latency: 20-100ms (network-dependent)
- Use case: Cloud deployments, team collaboration, third-party services
- Security: Full TLS support, authentication tokens, audit logging
Understanding these transport options is crucial, but choosing the right one depends on your deployment pattern. Let's explore when to use local versus remote deployments.
Local vs Remote Deployment Patterns
Local Deployment (STDIO):
Process"] SS1 -->|"Direct Access"| DB1[("Local SQLite
Database")] style HD1 fill:#4a90e2,stroke:#fff,stroke-width:2px,color:#fff style CS1 fill:#50c878,stroke:#fff,stroke-width:2px,color:#fff style SS1 fill:#50c878,stroke:#fff,stroke-width:2px,color:#fff style DB1 fill:#666,stroke:#fff,stroke-width:2px,color:#fff
Remote Deployment (HTTP + SSE):
Internet"| INT["Firewall/Router"] INT -->|"HTTPS"| SS2["MCP Server
Cloud"] SS2 -->|"Network Query"| DB2[("PostgreSQL
Remote DB")] style HD2 fill:#4a90e2,stroke:#fff,stroke-width:2px,color:#fff style CS2 fill:#50c878,stroke:#fff,stroke-width:2px,color:#fff style INT fill:#ff9500,stroke:#fff,stroke-width:2px,color:#fff style SS2 fill:#ff9500,stroke:#fff,stroke-width:2px,color:#fff style DB2 fill:#666,stroke:#fff,stroke-width:2px,color:#fff
Local Server Deployment
Best for development and personal use. Server runs on your machine, accessed via STDIO:
# server.py (local deployment)
from mcp.server import Server
from mcp.server.stdio import stdio_server
import sqlite3

server = Server("expense-tracker")

@server.tool()
async def add_expense(amount: float, category: str):
    # Access local SQLite database
    db = sqlite3.connect("expenses.db")
    db.execute("INSERT INTO expenses VALUES (?, ?)", (amount, category))
    db.commit()
    return {"success": True}

async def main():
    async with stdio_server() as (read, write):
        await server.run(read, write, server.create_initialization_options())

if __name__ == "__main__":
    import asyncio
    asyncio.run(main())
Configuration (claude_desktop_config.json):
{
  "mcpServers": {
    "expenses": {
      "command": "python",
      "args": ["/Users/alice/.mcp/expense-tracker/server.py"]
    }
  }
}
Remote Server Deployment
For production and team collaboration, deploy server to the cloud using HTTP transport:
# server.py (remote deployment)
from mcp.server import Server
from mcp.server.sse import SseServerTransport
from starlette.applications import Starlette
from starlette.routing import Route
import uvicorn
import asyncpg

server = Server("expense-tracker-prod")

@server.tool()
async def add_expense(amount: float, category: str):
    # Access remote PostgreSQL database
    db = await asyncpg.connect("postgresql://user:pass@db.example.com/expenses")
    await db.execute("INSERT INTO expenses VALUES ($1, $2)", amount, category)
    return {"success": True}

app = Starlette()
sse = SseServerTransport("/messages")

async def handle_sse(request):
    async with sse.connect_sse(
        request.scope,
        request.receive,
        request._send
    ) as streams:
        await server.run(streams[0], streams[1], server.create_initialization_options())

app.add_route("/sse", handle_sse)

if __name__ == "__main__":
    # Deploy: gunicorn -w 1 -k uvicorn.workers.UvicornWorker server:app
    uvicorn.run(app, host="0.0.0.0", port=8000)
Configuration (remote access):
{
  "mcpServers": {
    "expenses-prod": {
      "url": "https://expense-tracker.example.com/sse",
      "transport": "sse"
    }
  }
}
Building MCP Clients
Basic Client Implementation
While most use existing hosts (Claude Desktop, VS Code), you can build custom clients for specialized workflows:
from mcp.client import Client
from mcp.client.stdio import stdio_client
from typing import List

async def main() -> None:
    """Basic MCP client example with type hints"""
    # Connect to server via STDIO
    async with stdio_client(
        command="python",
        args=["server.py"]
    ) as (read, write):

        async with Client(read, write) as client:
            # Initialize
            await client.initialize()

            # List available tools
            tools = await client.list_tools()
            print(f"Available tools: {[t.name for t in tools]}")

            # Call a tool
            result = await client.call_tool(
                "add_expense",
                arguments={"amount": 50, "category": "food"}
            )

            print(f"Result: {result.content[0].text}")

if __name__ == "__main__":
    import asyncio
    asyncio.run(main())
Multi-Server Client
The real power: one client connecting to multiple servers, routing tool calls appropriately:
from mcp.client import Client
from mcp.client.stdio import stdio_client
from mcp.client.http import http_client

class MultiServerClient:
    def __init__(self):
        self.servers = {}

    async def add_server(self, name, transport_config):
        """Add a new server connection"""
        if transport_config.get("type") == "stdio":
            connection = stdio_client(
                command=transport_config["command"],
                args=transport_config["args"]
            )
        else:
            connection = http_client(url=transport_config["url"])

        async with Client(*connection) as client:
            await client.initialize()
            tools = await client.list_tools()

            self.servers[name] = {
                "client": client,
                "tools": {t.name: t for t in tools}
            }

    async def call_tool(self, server_name, tool_name, arguments):
        """Route tool call to correct server"""
        if server_name not in self.servers:
            raise ValueError(f"Unknown server: {server_name}")

        client = self.servers[server_name]["client"]
        return await client.call_tool(tool_name, arguments)

    def list_all_tools(self):
        """Get all tools from all servers"""
        all_tools = {}
        for server_name, server_data in self.servers.items():
            all_tools[server_name] = list(server_data["tools"].keys())
        return all_tools

# Usage
async def main():
    multi_client = MultiServerClient()

    # Add local expense tracker
    await multi_client.add_server(
        "expenses",
        {"type": "stdio", "command": "python", "args": ["expense-server.py"]}
    )

    # Add remote GitHub server
    await multi_client.add_server(
        "github",
        {"type": "http", "url": "https://mcp-github.example.com/sse"}
    )

    # List all available tools
    print(multi_client.list_all_tools())
    # Output: {
    #   "expenses": ["add_expense", "list_expenses", "total_expenses"],
    #   "github": ["create_issue", "list_repos", "create_pr"]
    # }

    # Call tools on specific servers
    await multi_client.call_tool(
        "expenses",
        "add_expense",
        {"amount": 30, "category": "food"}
    )

    await multi_client.call_tool(
        "github",
        "create_issue",
        {"repo": "my-repo", "title": "Bug: Login broken"}
    )
While building custom clients gives you full control, many developers use existing frameworks. LangChain, a popular AI orchestration framework, has excellent MCP integration that simplifies multi-server workflows.
LangChain Integration
Use MCP servers seamlessly within LangChain workflows:
STDIO"] G["GitHub Server
HTTP"] end subgraph LangChain_Framework["LangChain"] MCPToolkit["MCPToolkit
Aggregates Tools"] Agent["OpenAI Agent
Decides Actions"] end subgraph User_Interface["User"] User["User Input
Add expense, create issue"] end User -->|Request| Agent Agent -->|Available Tools| MCPToolkit MCPToolkit -->|add_expense| E MCPToolkit -->|create_issue| G E -->|Result| Agent G -->|Result| Agent Agent -->|Final Answer| User
from langchain_mcp import MCPToolkit
from langchain_openai import ChatOpenAI
from langchain.agents import create_openai_functions_agent, AgentExecutor

# Create MCP toolkit with multiple servers
toolkit = MCPToolkit(
    servers=[
        {
            "name": "expenses",
            "command": "python",
            "args": ["expense-server.py"],
            "transport": "stdio"
        },
        {
            "name": "github",
            "url": "https://mcp-github.example.com/sse",
            "transport": "http"
        }
    ]
)

# Get all tools as LangChain tools
tools = toolkit.get_tools()

# Create agent with OpenAI
llm = ChatOpenAI(model="gpt-4")
agent = create_openai_functions_agent(llm, tools)
executor = AgentExecutor.from_agent_and_tools(agent, tools)

# Use in workflow
result = executor.invoke({
    "input": "Add a $50 expense for coffee and create a GitHub issue for the expense tracker"
})

print(result["output"])
Practical Example: Complete Expense Tracker
Let's build a complete production-ready MCP server for expense tracking:
Calls Tools"] end subgraph MS["MCP Server"] Server["Expense Tracker
STDIO Transport"] Tools["Tools Available"] end subgraph ST["Storage"] JSON["expenses.json
Persistent"] end subgraph TF["Tool Functions"] Add["add_expense"] List["list_expenses"] Delete["delete_expense"] Summary["get_summary"] end Claude -->|Call Tool| Server Server --> Tools Tools --> Add Tools --> List Tools --> Delete Tools --> Summary Add -->|Read/Write| JSON List -->|Read| JSON Delete -->|Delete| JSON Summary -->|Aggregate| JSON JSON -->|Return Result| Claude style Claude fill:#4a90e2 style Server fill:#50c878 style JSON fill:#ff9500
# expense_tracker_server.py
from mcp.server import Server
from mcp.server.stdio import stdio_server
from mcp.types import Tool, TextContent
import json
import os
from datetime import datetime
from typing import Optional

server = Server("expense-tracker")
EXPENSES_FILE = "expenses.json"

def load_expenses():
    if os.path.exists(EXPENSES_FILE):
        with open(EXPENSES_FILE, 'r') as f:
            return json.load(f)
    return []

def save_expenses(expenses):
    with open(EXPENSES_FILE, 'w') as f:
        json.dump(expenses, f, indent=2)

@server.list_tools()
async def list_tools() -> list[Tool]:
    return [
        Tool(
            name="add_expense",
            description="Add a new expense to tracker",
            inputSchema={
                "type": "object",
                "properties": {
                    "amount": {"type": "number", "description": "Expense amount"},
                    "category": {"type": "string", "description": "Expense category"},
                    "description": {"type": "string", "description": "Optional description"},
                    "date": {"type": "string", "description": "Date (ISO format, defaults to today)"}
                },
                "required": ["amount", "category"]
            }
        ),
        Tool(
            name="list_expenses",
            description="List all expenses with optional filtering",
            inputSchema={
                "type": "object",
                "properties": {
                    "category": {"type": "string", "description": "Filter by category"},
                    "start_date": {"type": "string", "description": "Start date (ISO format)"},
                    "end_date": {"type": "string", "description": "End date (ISO format)"},
                    "limit": {"type": "integer", "description": "Max results"}
                }
            }
        ),
        Tool(
            name="get_summary",
            description="Get spending summary",
            inputSchema={
                "type": "object",
                "properties": {
                    "period": {"type": "string", "enum": ["daily", "weekly", "monthly", "yearly"]},
                    "category": {"type": "string", "description": "Filter by category"}
                }
            }
        ),
        Tool(
            name="delete_expense",
            description="Delete an expense by ID",
            inputSchema={
                "type": "object",
                "properties": {
                    "expense_id": {"type": "integer", "description": "Expense ID"}
                },
                "required": ["expense_id"]
            }
        )
    ]

@server.call_tool()
async def call_tool(name: str, arguments: dict) -> list[TextContent]:
    if name == "add_expense":
        expenses = load_expenses()
        expense = {
            "id": max([e.get("id", 0) for e in expenses] + [0]) + 1,
            "amount": arguments["amount"],
            "category": arguments["category"],
            "description": arguments.get("description", ""),
            "date": arguments.get("date", datetime.now().isoformat().split('T')[0])
        }
        expenses.append(expense)
        save_expenses(expenses)

        return [TextContent(
            type="text",
            text=f"Added expense: ${expense['amount']:.2f} ({expense['category']}) on {expense['date']}"
        )]

    elif name == "list_expenses":
        expenses = load_expenses()
        category = arguments.get("category")

        if category:
            expenses = [e for e in expenses if e["category"].lower() == category.lower()]

        if not expenses:
            return [TextContent(type="text", text="No expenses found.")]

        result = "\n".join([
            f"• ID {e['id']}: ${e['amount']:.2f} - {e['category']} - {e['description'] or 'N/A'} ({e['date']})"
            for e in expenses
        ])

        return [TextContent(type="text", text=f"Your expenses:\n{result}")]

    elif name == "get_summary":
        expenses = load_expenses()
        category = arguments.get("category")

        if category:
            expenses = [e for e in expenses if e["category"].lower() == category.lower()]

        total = sum(e["amount"] for e in expenses)

        # Group by category
        by_category = {}
        for e in expenses:
            cat = e["category"]
            by_category[cat] = by_category.get(cat, 0) + e["amount"]

        summary = f"Total Spending: ${total:.2f}\n\nBy Category:\n"
        for cat, amount in sorted(by_category.items(), key=lambda x: x[1], reverse=True):
            summary += f"• {cat}: ${amount:.2f}\n"

        return [TextContent(type="text", text=summary)]

    elif name == "delete_expense":
        expenses = load_expenses()
        expense_id = arguments["expense_id"]

        initial_count = len(expenses)
        expenses = [e for e in expenses if e["id"] != expense_id]

        if len(expenses) == initial_count:
            return [TextContent(type="text", text=f"Expense {expense_id} not found.")]

        save_expenses(expenses)
        return [TextContent(type="text", text=f"Deleted expense {expense_id}.")]

    raise ValueError(f"Unknown tool: {name}")

async def main():
    async with stdio_server() as (read_stream, write_stream):
        await server.run(
            read_stream,
            write_stream,
            server.create_initialization_options()
        )

if __name__ == "__main__":
    import asyncio
    asyncio.run(main())
Key Engineering Properties
MCP provides specific technical guarantees that make it production-ready:
| Property | Description | Benefit |
|---|---|---|
| Protocol-Driven | Standardized JSON-RPC format, versioned, language-agnostic | Any language can implement MCP servers |
| Decoupled Architecture | Host ≠ Client ≠ Server with clear boundaries | Each component replaceable independently |
| Fault Isolation | 1:1 client-server relationship | One server crash doesn't affect others |
| Horizontal Scalability | Add servers without modifying clients | Grows with your needs |
| Tool Standardization | JSON Schema for inputs, structured outputs | Consistent error handling everywhere |
| Transport Flexibility | Same protocol, multiple transports (STDIO, HTTP, Serverless) | Deploy anywhere without protocol changes |
Patterns and Anti-Patterns
Good Patterns
Single responsibility servers:
# Good: Focused server with clear purpose
github_server = Server("github")

@github_server.tool()
async def create_issue(repo: str, title: str, body: str): pass

@github_server.tool()
async def list_repos(username: str): pass

@github_server.tool()
async def create_pr(repo: str, title: str, from_branch: str, to_branch: str): pass
Clear capability boundaries:
# Good: Resources for reading, tools for writing
@server.resource("file:///{path}")
async def read_file(path: str):
    """No side effects - safe to call multiple times"""
    return {"uri": f"file:///{path}", "text": open(path).read()}

@server.tool()
async def write_file(path: str, content: str):
    """Has side effects - modifies state"""
    with open(path, 'w') as f:
        f.write(content)
    return {"success": True}
Robust error handling:
# Good: Detailed, actionable error messages
@server.tool()
async def add_expense(amount: float, category: str):
    if amount <= 0:
        raise ValueError("Amount must be positive")

    if not category:
        raise ValueError("Category cannot be empty")

    try:
        db.insert(amount, category)
        return {"success": True}
    except DatabaseError as e:
        raise RuntimeError(f"Failed to save expense: {str(e)}")
Anti-Patterns to Avoid
God servers (mixing concerns):
# Bad: One server doing everything
mega_server = Server("everything")
@mega_server.tool()
async def read_file(...): pass
@mega_server.tool()
async def send_email(...): pass
@mega_server.tool()
async def query_database(...): pass
@mega_server.tool()
async def search_web(...): pass
# This defeats the purpose of decoupling
Mixing tool and resource concerns:
# Bad: Tool that should be a resource
@server.tool()
async def get_user_profile(user_id: int):
    # This has no side effects - should be a resource!
    return db.query("SELECT * FROM users WHERE id = ?", user_id)

# Correct:
@server.resource("user://{user_id}")
async def get_user_profile(user_id: int):
    return {"uri": f"user://{user_id}", "data": {...}}
Skipping initialization:
# Bad: Using client without initialization
client = Client(read, write)
tools = await client.list_tools()  # FAILS!

# Correct:
client = Client(read, write)
await client.initialize()  # Always first!
tools = await client.list_tools()  # Now works
Comparison with Alternatives
| Aspect | MCP | REST APIs | Function Calling | LangChain Tools |
|---|---|---|---|---|
| Purpose | AI tool integration protocol | General data access | LLM tool use | Python tool framework |
| Standardization | Universal protocol | Provider-specific (OpenAPI) | Provider-specific | Framework-specific |
| Language Support | Any (JSON-RPC) | Any (HTTP) | Provider-specific | Python only |
| Reusability | Across all MCP hosts | Very high (universal) | Provider only | LangChain only |
| Discovery | Automatic (runtime) | Manual (OpenAPI) | Static definitions | Static definitions |
| Best Use Case | Production AI apps | General APIs | Simple integrations | Rapid prototyping |
Debugging MCP Applications
Common Issues and Solutions
Issue: Server not connecting
# Check if server process starts
python server.py
# Should print nothing and wait for input (not crash)

# Check configuration path is absolute
{
  "command": "python",
  "args": ["/Users/alice/servers/expense-tracker.py"]  # Not relative!
}

# On Windows, check path with backslashes
{
  "command": "python",
  "args": ["C:\\Users\\alice\\servers\\expense-tracker.py"]
}
Issue: Tools not appearing in Claude
# Ensure tools are registered BEFORE server.run()
@server.list_tools()
async def list_tools():
    return [...]  # Must return non-empty list

# Check initialization completed
await client.initialize()  # Required!
tools = await client.list_tools()

# Restart Claude Desktop completely (not just reload)
Issue: JSON-RPC protocol errors
// Invalid request (missing jsonrpc version)
{"method": "tools/call", "params": {...}}  // Invalid

// Valid request
{"jsonrpc": "2.0", "method": "tools/call", "id": 1, "params": {...}}  // Valid

// Invalid: missing request id
{"jsonrpc": "2.0", "method": "tools/call"}  // Invalid

// Valid: all required fields
{"jsonrpc": "2.0", "id": 123, "method": "tools/call", "params": {...}}  // Valid
Issue: Transport errors with HTTP
# Check server is running and reachable
import requests
response = requests.get("https://your-server.com/sse")
# Should return 200 OK

# Check SSL certificates if using HTTPS
# Add to debug: verify=False (development only!)
async with http_client(
    url="https://your-server.com/sse",
    verify_ssl=False  # Development only!
) as (read, write):
    ...

# Check firewall isn't blocking port
# Use curl to test
curl https://your-server.com/sse
Debugging Tools
- MCP Inspector: Official debugging UI for testing servers
- Server logs: Add logging statements in your server code
- Client-side error handlers: Catch and log all errors
- Network inspection: Use curl/Postman for HTTP transports
- JSON validation: Verify all JSON-RPC messages are well-formed
Getting Started with MCP
Step 1: Choose Your Framework
- Python: Use `pip install mcp`
- Node.js: Use `npm install @modelcontextprotocol/sdk`
- Other languages: Implement JSON-RPC directly
Step 2: Create Your First Server
from mcp.server import Server
from mcp.server.stdio import stdio_server

server = Server(name="hello-world")

@server.tool()
async def greet(name: str) -> str:
    """Greet someone"""
    return f"Hello, {name}! Welcome to MCP."

async def main():
    async with stdio_server() as (read, write):
        await server.run(read, write, server.create_initialization_options())

if __name__ == "__main__":
    import asyncio
    asyncio.run(main())
Step 3: Configure Claude Desktop
Find your config file:
- Mac: `~/Library/Application Support/Claude/claude_desktop_config.json`
- Windows: `%APPDATA%\Claude\claude_desktop_config.json`
- Linux: `~/.config/Claude/claude_desktop_config.json`
Add your server:
{
  "mcpServers": {
    "hello-world": {
      "command": "python",
      "args": ["/Users/alice/.mcp/hello-world/server.py"]
    }
  }
}
Important: Use absolute paths, not relative paths. Get the full path with `pwd` (Mac/Linux) or `cd` (Windows).
Step 4: Test It
- Restart Claude Desktop completely
- Look for the 🔨 hammer icon in Claude (indicates MCP connected)
- Try: "Greet me with my name"
- Claude should call your server's `greet` tool
FastMCP: Simplified MCP Server Development
While the official MCP SDK is powerful and production-ready, it requires significant boilerplate code for schema definitions, tool registration, and transport configuration. FastMCP is a third-party framework built on top of the official MCP SDK that dramatically reduces this complexity.
Think of it as Flask for MCP—a lightweight, developer-friendly wrapper that handles the protocol details automatically while letting you focus on business logic. FastMCP is fully protocol-compliant and widely adopted in the MCP community for rapid development.
The Philosophy: Less Boilerplate, Same Power
Official MCP SDK (verbose):
from mcp.server import Server
from mcp.server.stdio import stdio_server
from mcp.types import Tool, TextContent

server = Server("expense-tracker")

@server.list_tools()
async def list_tools() -> list[Tool]:
    return [
        Tool(
            name="add_expense",
            description="Add a new expense",
            inputSchema={
                "type": "object",
                "properties": {
                    "amount": {"type": "number"},
                    "category": {"type": "string"}
                },
                "required": ["amount", "category"]
            }
        )
    ]

@server.call_tool()
async def call_tool(name: str, arguments: dict) -> list[TextContent]:
    if name == "add_expense":
        # ... logic here
        return [TextContent(type="text", text="Added")]

async def main():
    async with stdio_server() as (read, write):
        await server.run(read, write, server.create_initialization_options())
FastMCP (clean):
from fastmcp import FastMCP

mcp = FastMCP("expense-tracker")

@mcp.tool()
def add_expense(amount: float, category: str) -> str:
    """Add a new expense"""
    # ... logic here
    return f"Added ${amount} ({category})"

if __name__ == "__main__":
    mcp.run()
Difference:** FastMCP handles tool discovery, schema generation, error handling, and transport automatically. You write the business logic—FastMCP handles the protocol.
Why You Should Consider FastMCP
| Aspect | Official MCP SDK | FastMCP |
|---|---|---|
| Learning Curve | Steep (protocol details exposed) | Gentle (familiar decorator pattern) |
| Code Verbosity | High (explicit schemas) | Low (inferred from types) |
| Type Hints | Required for clarity | Auto-generates schemas from hints |
| Time to First Server | 30-45 minutes | 5 minutes |
| Setup.py/pyproject.toml | Required | Optional |
| Development Speed | Slower | Faster |
| Production Ready | Fully mature | Fully mature |
| Advanced Control | Full access | Good access |
FastMCP Complete Example
from fastmcp import FastMCP
import json
import os
from datetime import datetime

mcp = FastMCP("expense-tracker")

EXPENSES_FILE = "expenses.json"

def load_expenses():
    if os.path.exists(EXPENSES_FILE):
        with open(EXPENSES_FILE, 'r') as f:
            return json.load(f)
    return []

def save_expenses(expenses):
    with open(EXPENSES_FILE, 'w') as f:
        json.dump(expenses, f, indent=2)

@mcp.tool()
def add_expense(amount: float, category: str, description: str = "") -> str:
    """Add a new expense to tracker"""
    expenses = load_expenses()
    expense = {
        "id": max([e.get("id", 0) for e in expenses] + [0]) + 1,
        "amount": amount,
        "category": category,
        "description": description,
        "date": datetime.now().isoformat().split('T')[0]
    }
    expenses.append(expense)
    save_expenses(expenses)
    return f"Added ${amount:.2f} ({category})"

@mcp.tool()
def list_expenses(category: str = None, limit: int = 100) -> str:
    """List all expenses"""
    expenses = load_expenses()

    if category:
        expenses = [e for e in expenses if e["category"].lower() == category.lower()]

    if not expenses:
        return "No expenses found."

    result = "\n".join([
        f"• ID {e['id']}: ${e['amount']:.2f} - {e['category']} ({e['date']})"
        for e in expenses[:limit]
    ])
    return f"Your expenses:\n{result}"

@mcp.tool()
def get_summary() -> str:
    """Get spending summary"""
    expenses = load_expenses()

    if not expenses:
        return "No expenses recorded."

    total = sum(e["amount"] for e in expenses)
    by_category = {}
    for e in expenses:
        cat = e["category"]
        by_category[cat] = by_category.get(cat, 0) + e["amount"]

    summary = f"Total Spending: ${total:.2f}\n\nBy Category:\n"
    for cat, amount in sorted(by_category.items(), key=lambda x: x[1], reverse=True):
        summary += f"• {cat}: ${amount:.2f}\n"

    return summary

@mcp.tool()
def delete_expense(expense_id: int) -> str:
    """Delete an expense"""
    expenses = load_expenses()
    initial_count = len(expenses)
    expenses = [e for e in expenses if e["id"] != expense_id]

    if len(expenses) == initial_count:
        return f"Expense {expense_id} not found."

    save_expenses(expenses)
    return f"Deleted expense {expense_id}."

if __name__ == "__main__":
    mcp.run()
Total: 70 lines of focused business logic. No schema definitions, no decorators complexity, no transport boilerplate.
FastMCP Cloud: Deploy in Seconds
FastMCP Cloud is a hosted platform that manages server lifecycle for you. Deploy servers with a single command:
# Install FastMCP CLI
pip install fastmcp

# Login with GitHub (free tier available)
fastmcp login

# Deploy your server
fastmcp deploy server.py

# Output:
# Deployed to: https://your-username-expense-tracker.fastmcp.dev
Why Use FastMCP Cloud?
- Zero infrastructure: No Docker, no Kubernetes, no server management
- Instant deployment: One command deploys instantly
- Free tier: Generous free tier for development and small projects
- Auto-scaling: Handles traffic spikes automatically
- GitHub integration: Push to GitHub, auto-deploy from main branch
- Environment variables: Secure secret management built-in
- Monitoring: Built-in logs, metrics, error tracking
- Custom domains: Use your own domain names (paid tier)
FastMCP Cloud Configuration
Create a `fastmcp.toml` in your project root:
[project]
name = "expense-tracker"
description = "Personal expense tracking with MCP"
version = "1.0.0"

[deployment]
python_version = "3.11"
requirements = "requirements.txt"

[environment]
DATABASE_URL = "${secrets.DATABASE_URL}"
API_KEY = "${secrets.API_KEY}"

[features]
auto_scaling = true
cold_start_optimization = true
FastMCP Cloud vs Manual Deployment
FastMCP Cloud:
Manual Deployment (AWS/Render):
Client Configuration for FastMCP Cloud
{
  "mcpServers": {
    "expenses": {
      "url": "https://your-username-expense-tracker.fastmcp.dev/sse",
      "transport": "sse"
    }
  }
}
That's it. Now Claude Desktop connects to your hosted server.
When to Use FastMCP vs Official SDK
Use FastMCP when:
- Building simple to moderate-complexity servers
- Want rapid development and iteration
- Don't need deep protocol customization
- Prefer intuitive Python patterns
- Want to deploy without infrastructure work
- Building for personal or small team use
Use Official MCP SDK when:
- Building enterprise-grade systems
- Need custom protocol extensions
- Complex resource streaming requirements
- Deep control over lifecycle and capabilities
- Implementing novel transport mechanisms
- Integrating into existing frameworks
GitHub Auto-Deploy with FastMCP Cloud
Link your repository for automatic deployment on every push:
# Connect GitHub repository
fastmcp link-repo https://github.com/yourusername/expense-tracker

# Now every push to main branch automatically deploys
git add server.py
git commit -m "Add budget feature"
git push origin main
# Automatically deployed to FastMCP Cloud
Secret Management
# Set secrets securely
fastmcp set-secret DATABASE_URL "postgresql://user:pass@db.com"
fastmcp set-secret API_KEY "sk-12345..."

# Use in code
import os
db_url = os.getenv("DATABASE_URL")
api_key = os.getenv("API_KEY")

# Secrets never appear in logs or deployment info
Official Documentation
Implementation
Want to learn more about AI engineering?
Get in Touch